
Learn Essential Skills And Master AutoCAD Today
Do you want to become super skilled at CAD but can’t find the time?
As a beginner CAD user, I know you all want to complete your project. But the fact is, you’re probably getting stuck in all the CAD clutter.
What kind of clutter am I talking about?
All the countless options, dialogs, and unnecessary features only keep you from completing your project. Learning AutoCAD alone can feel overwhelming, especially with so many tools that seem nearly impossible to master.
An online AutoCAD course for beginners can make all the difference. With the right guidance, you can cut through the clutter and quickly get up to speed, allowing you to focus on what truly matters—completing your project.
Imagine creating high-quality CAD drawings without stumbling and getting lost in CAD confusion.
The good news is, you can! I will show you how to use CAD and take it by the reins to make the program work for you. You don’t need to labor over your projects any longer.
In this online CAD class for beginners, I’ll take you from someone who might feel very intimidated by CAD into someone who can confidently call themselves a real CAD operator—or even a CAD consultant. Whether you’re new to design or have dabbled in it before, this course is structured to give you the foundational skills needed to easily tackle projects.
At the end of this online CAD class, you’ll have both the strong foundation and the confidence that you need to take your drawings to the next level. Get ready to unlock your potential as you learn CAD the right way!
Introducing Shortcut CAD
An online course for those struggling to learn CAD and are ready to start designing technical drawings, no matter what industry you may be in.
Over the years, I’ve worked with many Autodesk-trained users who also developed their own workflows, some good and some pretty bad.
I’ve also experienced some common pitfalls of learning CAD for the first time.
The biggest mistake I see is that new users will plunge into CAD without learning the foundation first. Then, over time, they develop bad habits and go around as they work through pressing deadlines… and these bad habits slow them down time and time again.
Interactive content throughout the course
I’ll provide PDF files you can download and refer to throughout the class. I’ll use real examples to show you the drawing process. You also have access to various learning quizzes.
Each module is about 30-45 minutes long and broken into simple 10-15 min work sessions.
What this course is all about
This course focuses on these primary objectives:
- Providing as close to the 1-to-1 mentorship experience as possible
- Learning concepts and building a solid CAD foundation effortlessly.
- Optimizing your CAD workflow by using various shortcuts.
- Delivering easy-to-follow lessons which are only 10-15 min long
- Breaking the barrier of complexity to simplify the drawing process.
- Providing you with over 9 hours of training with lifetime access
A super quick walkthrough of the modules in the course
Shortcut CAD teaches you the most straightforward way to draw by decluttering the interface. It also teaches you how to use the command line efficiently, demystifies you on how to set up styles, uses annotative scaling, blocks, Xrefing, and so much more.
10 Reasons Why This is the Best AutoCAD Course Online for Beginners to Master Shortcuts and Succeed
Learning AutoCAD as a beginner can be overwhelming with all the clutter and complex features. Shortcut CAD is designed to cut through the confusion, helping you learn quickly and efficiently. Here are 10 reasons why it’s the perfect course for beginners:
1. Focus on Time-Saving Shortcuts
Learn the most effective CAD shortcuts from day one. This will allow you to work faster and avoid unnecessary steps that other courses often teach.
2. Simplified Learning Process
Shortcut CAD breaks down complicated features into easy-to-follow lessons, so you can focus on what matters without getting bogged down by unnecessary details.
3. Hands-On Learning with Real Projects
Instead of just theory, you’ll work on real-world projects, helping you apply what you learn immediately.
4. Fits into Your Busy Schedule
Each lesson is 10-15 minutes long, making it easy to fit into your day, no matter how busy you are.
5. Step-by-Step Guidance
Unlike in many other beginner courses, you’ll receive clear, step-by-step instructions so you won’t feel overwhelmed or lost.
6. Avoid Developing Bad Habits
Learn the right way from the start, avoiding the common mistakes and bad habits many beginners pick up in other courses.
7. Learn to Customize Your Workspace
Customizing your workspace to fit your workflow is key to efficient AutoCAD use. Shortcut CAD teaches you how to set up and optimize your workspace, ensuring you can work comfortably and efficiently.
8. Lifetime Access
With lifetime access to all the materials, you can always revisit lessons whenever you need a refresher.
9. Affordable with Full Support
At just $149, Shortcut CAD offers great value with personalized support—something many other courses don’t provide.
10. Risk-Free Guarantee
If you’re not satisfied, you can try the course risk-free with a full refund available within the first two weeks.
Here’s what I’ll be covering in each module.
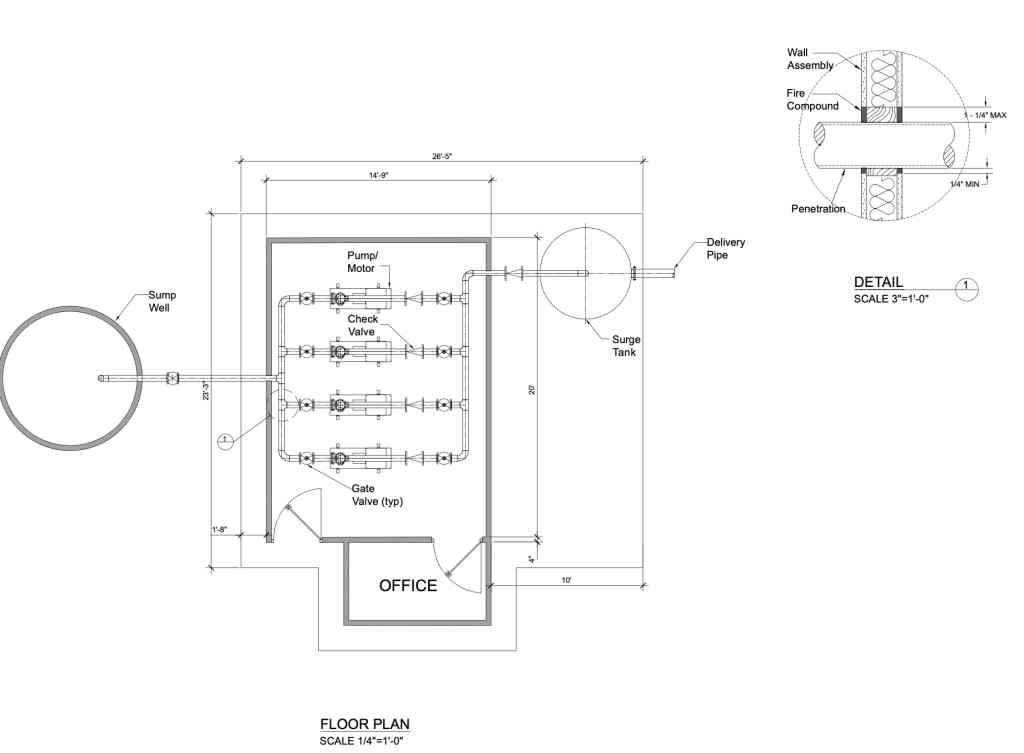
We’ll be working on a pumphouse project, which we will draw throughout this class. This will allow you to master inputting a drawing and setting up the drawing sheets.
- Module 0 – Welcome / Set Up – Here, you’ll see the roadmap of what we’ll cover and what software you’ll need to get started.
- Module 1 Creating a simple CAD workspace – I’ll show you how you can easily declutter your workspace and how to auto-hide toolbars and ribbons so that they can be activated only when needed. We’ll also go over how to navigate around in a drawing.
- Module 2 – Basic input of a drawing – We’ll discuss the X and Y coordinate system, and direct distance input and then start a small detail of our project and practice some basic input using a series of shortcuts. We are starting to move ahead at a constant yet easy pace.
- Module 3 – The importance of object snapping – As we wrap up our wall detail, you’ll learn how to use object snaps and grips and their vital role in creating accurate drawings. We’ll also practice apparent intersections, snap overrides, referencing, and other shortcuts and tips.
- Module 4—Understanding CAD templates — In the template module, you’ll learn the importance of using DWT files to save time. I’ll provide an example template with title block information and various settings.
- Module 5—Using Blocks to Your Advantage — This module will discuss the importance of blocks and how to create and edit them. We’ll also demystify and simplify how to use block attributes. Lastly, I’ll walk you through how to create an Xref. Downloadables are provided.
- Module 6—Drawing input — We’ll be working on a floor plan input for our pump house. I’ll show you how to use dynamic input and explain the importance of polylines. We’ll also discuss line types and use various shortcuts to complete our drawing.
- Module 7—Piping and tanks input — I’ll show you how to add piping, valves, pumps, and tanks to our project. The exercise here really teaches how to use blocks. If you use Mech-Q, after this module, you’ll better understand direct distance input and DIMSCALE.
In this module, you’ll have the choice to do either or even both:
1) Quick method: Use an add-on to input (Mech-Q download provided).
2) Manual method: Assemble the drawing with blocks only (small library provided).
- Module 8 – Using Layers – In this module, we will dive deep into how to use layers to organize our project better. I’ll show you a series of shortcuts on how to activate, move, isolate and modify them. We’ll also a couple of layer states to see how quickly you can recall various drawing “snapshots”.
- Module 9 – Annotations and Dimensions – In this module, we’ll jump right into understanding annotations and dimensions – specifically, how to create styles for each. I’ll also provide a download so you can copy and paste the styles covered in this lesson.
- Module 10 – Dimensions, Leaders and Notes – Now that our pump house is input, I’ll show you how to use the styles we set up in the last module. I’ll show you how to dimension and add notes to our drawing. We will also revisit your DIMSCALE setting and how this factors in with our final plot scale.
- Module 11 – Paperspace, Viewports & Scaling – We are ready to print our project. I’ll show you how to use Paperspace and create Viewports. We’ll also explore the difference between standard and annotative scaling.
- Module 12—Plotting (printing) In our last module, we made some last-minute revisions before previewing our project. Lastly, we’ll add a few notations directly in Paperspace and then print/plot our pump house.
Bonus modules
I’ll also to include these 2 free modules at no additional cost:
- Module 13—Recovery and backup (bonus module)—$50 value—I’ll show you how to check your recovery settings and what to do after a program crash using your backups and autosaves. Plus, after setting up our Google Drive, I’ll show you how to back up or even share a file in the cloud, all within CAD.
- Module 14 – Intro to 3D (bonus module) $75 value – We’ll create 3D roofs, walls, and doors for our pump house as we explore basic modeling concepts. We’ll also discuss the UCS and how to manipulate it. I’ll also show you how to create 2D elevations from our 3D model.
Is Shortcut CAD for me?
This course is for you if …
- You’re just starting CAD without any experience.
- You’re completely overwhelmed with all there is to learn.
- You’ve got some CAD background but still struggle to draw.
- You’re seeking to become a CAD consultant and make more money at CAD
- You’re too busy and can’t find time to learn CAD.
- You want to improve your drawing speed.
- You need to transition from hand drawing to CAD painlessly.
- You’re looking for a class with both support and mentorship included.
Again this is a zero-risk purchase—the risk is on me!
I want you to be over-the-moon delighted with Shortcut CAD. However, if you’re not entirely satisfied with the course’s content and direction within the first two weeks, please contact me for a full refund, no questions asked.
Who is this anyway?

Hi, I’m Erik Z, and I enjoy helping CAD users like you become highly skilled at CAD and create drawings with minimal stress and effort.
I was once like you. When I first started CAD over 25 years ago, I went from pencil drafting to a CAD operator working for a structural engineering office. I, too, struggled to take myself to the next level.
Using my shortcut methods I can draw up sheet sets in days instead of weeks and I’m ready and raring to help you achieve this too!
Got A Question?
Here are the answers to some of the most commonly asked questions. If you have a different question, just contact me here and I’ll get that answered.
- Do you offer direct support?
Yes! One of the biggest advantages of this beginning AutoCAD course is the CAD mentorship you’ll receive. You can contact me directly through the course community, and I’ll always respond within a day. You won’t find this personalized support with free resources like YouTube tutorials. - Why not just use YouTube to learn AutoCAD?
While YouTube may offer a lot of free videos, the problem is that they’re scattered and often don’t take you through an entire, structured training program. Learning is fragmented, and there’s no direct support if you get stuck. This course offers a clear learning path, ongoing support, and practical projects designed to ensure you master AutoCAD step by step, giving you a complete foundation from start to finish. - What’s required for the course?
To get started, you’ll need a 2D AutoCAD-like application. I can provide 2D/3D CAD software (AViCAD) for 30 days if you don’t have one. After that, it’s $49/month, and you can cancel anytime. Only the 3D bonus module requires full 2D and 3D CAD functionality. - Is this class just for beginners?
Yes, this course is designed for those just starting AutoCAD. It’s perfect for beginners, but it’s also useful for those with some experience struggling to boost their productivity. - Will metric users benefit from this course?
Absolutely! The concepts and shortcuts you learn apply equally to imperial and metric units. If you need one, I’ll also provide a metric title block so metric users can easily follow along. - I have a Mac. Will this be a problem?
If you already have AutoCAD for Mac, you’re good to go. If not, you must use Parallels to run AViCAD, our Windows-based AutoCAD-like software.
